Showing posts with label Pinkfresh Studio. Show all posts

Friday, 13 May 2022

Pinkfresh Studio Happy Heart - Hand Stitching

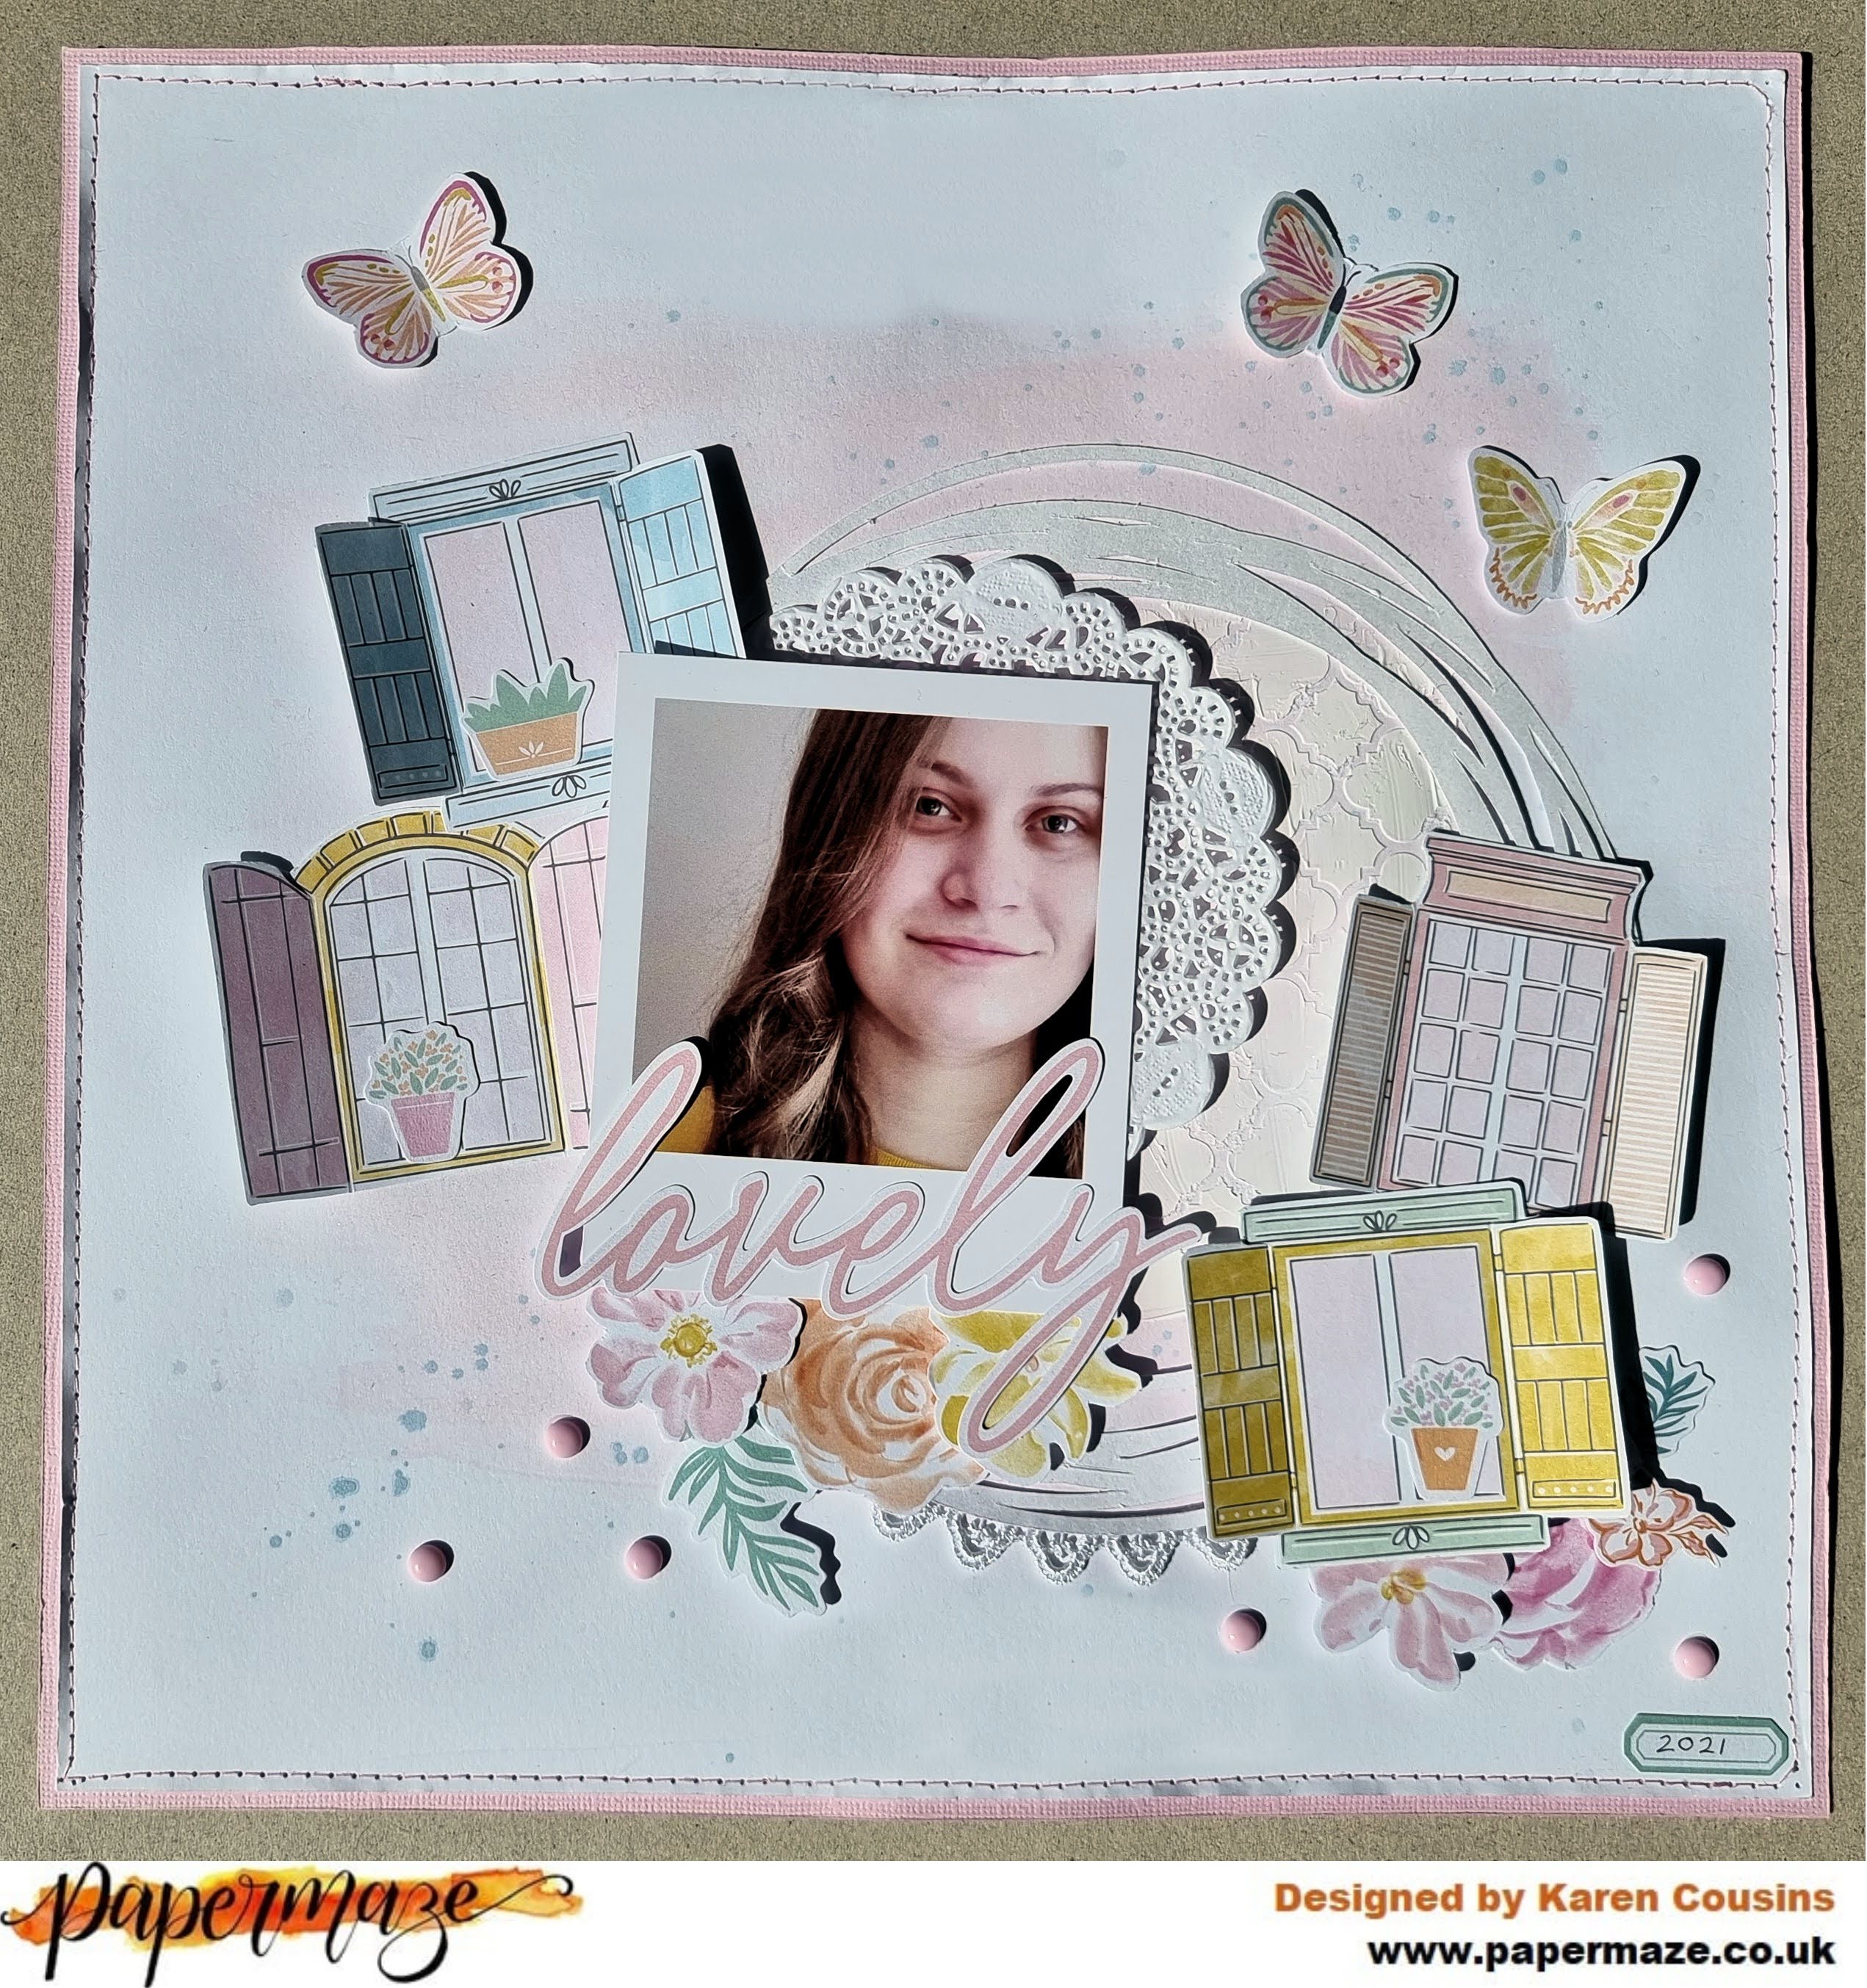
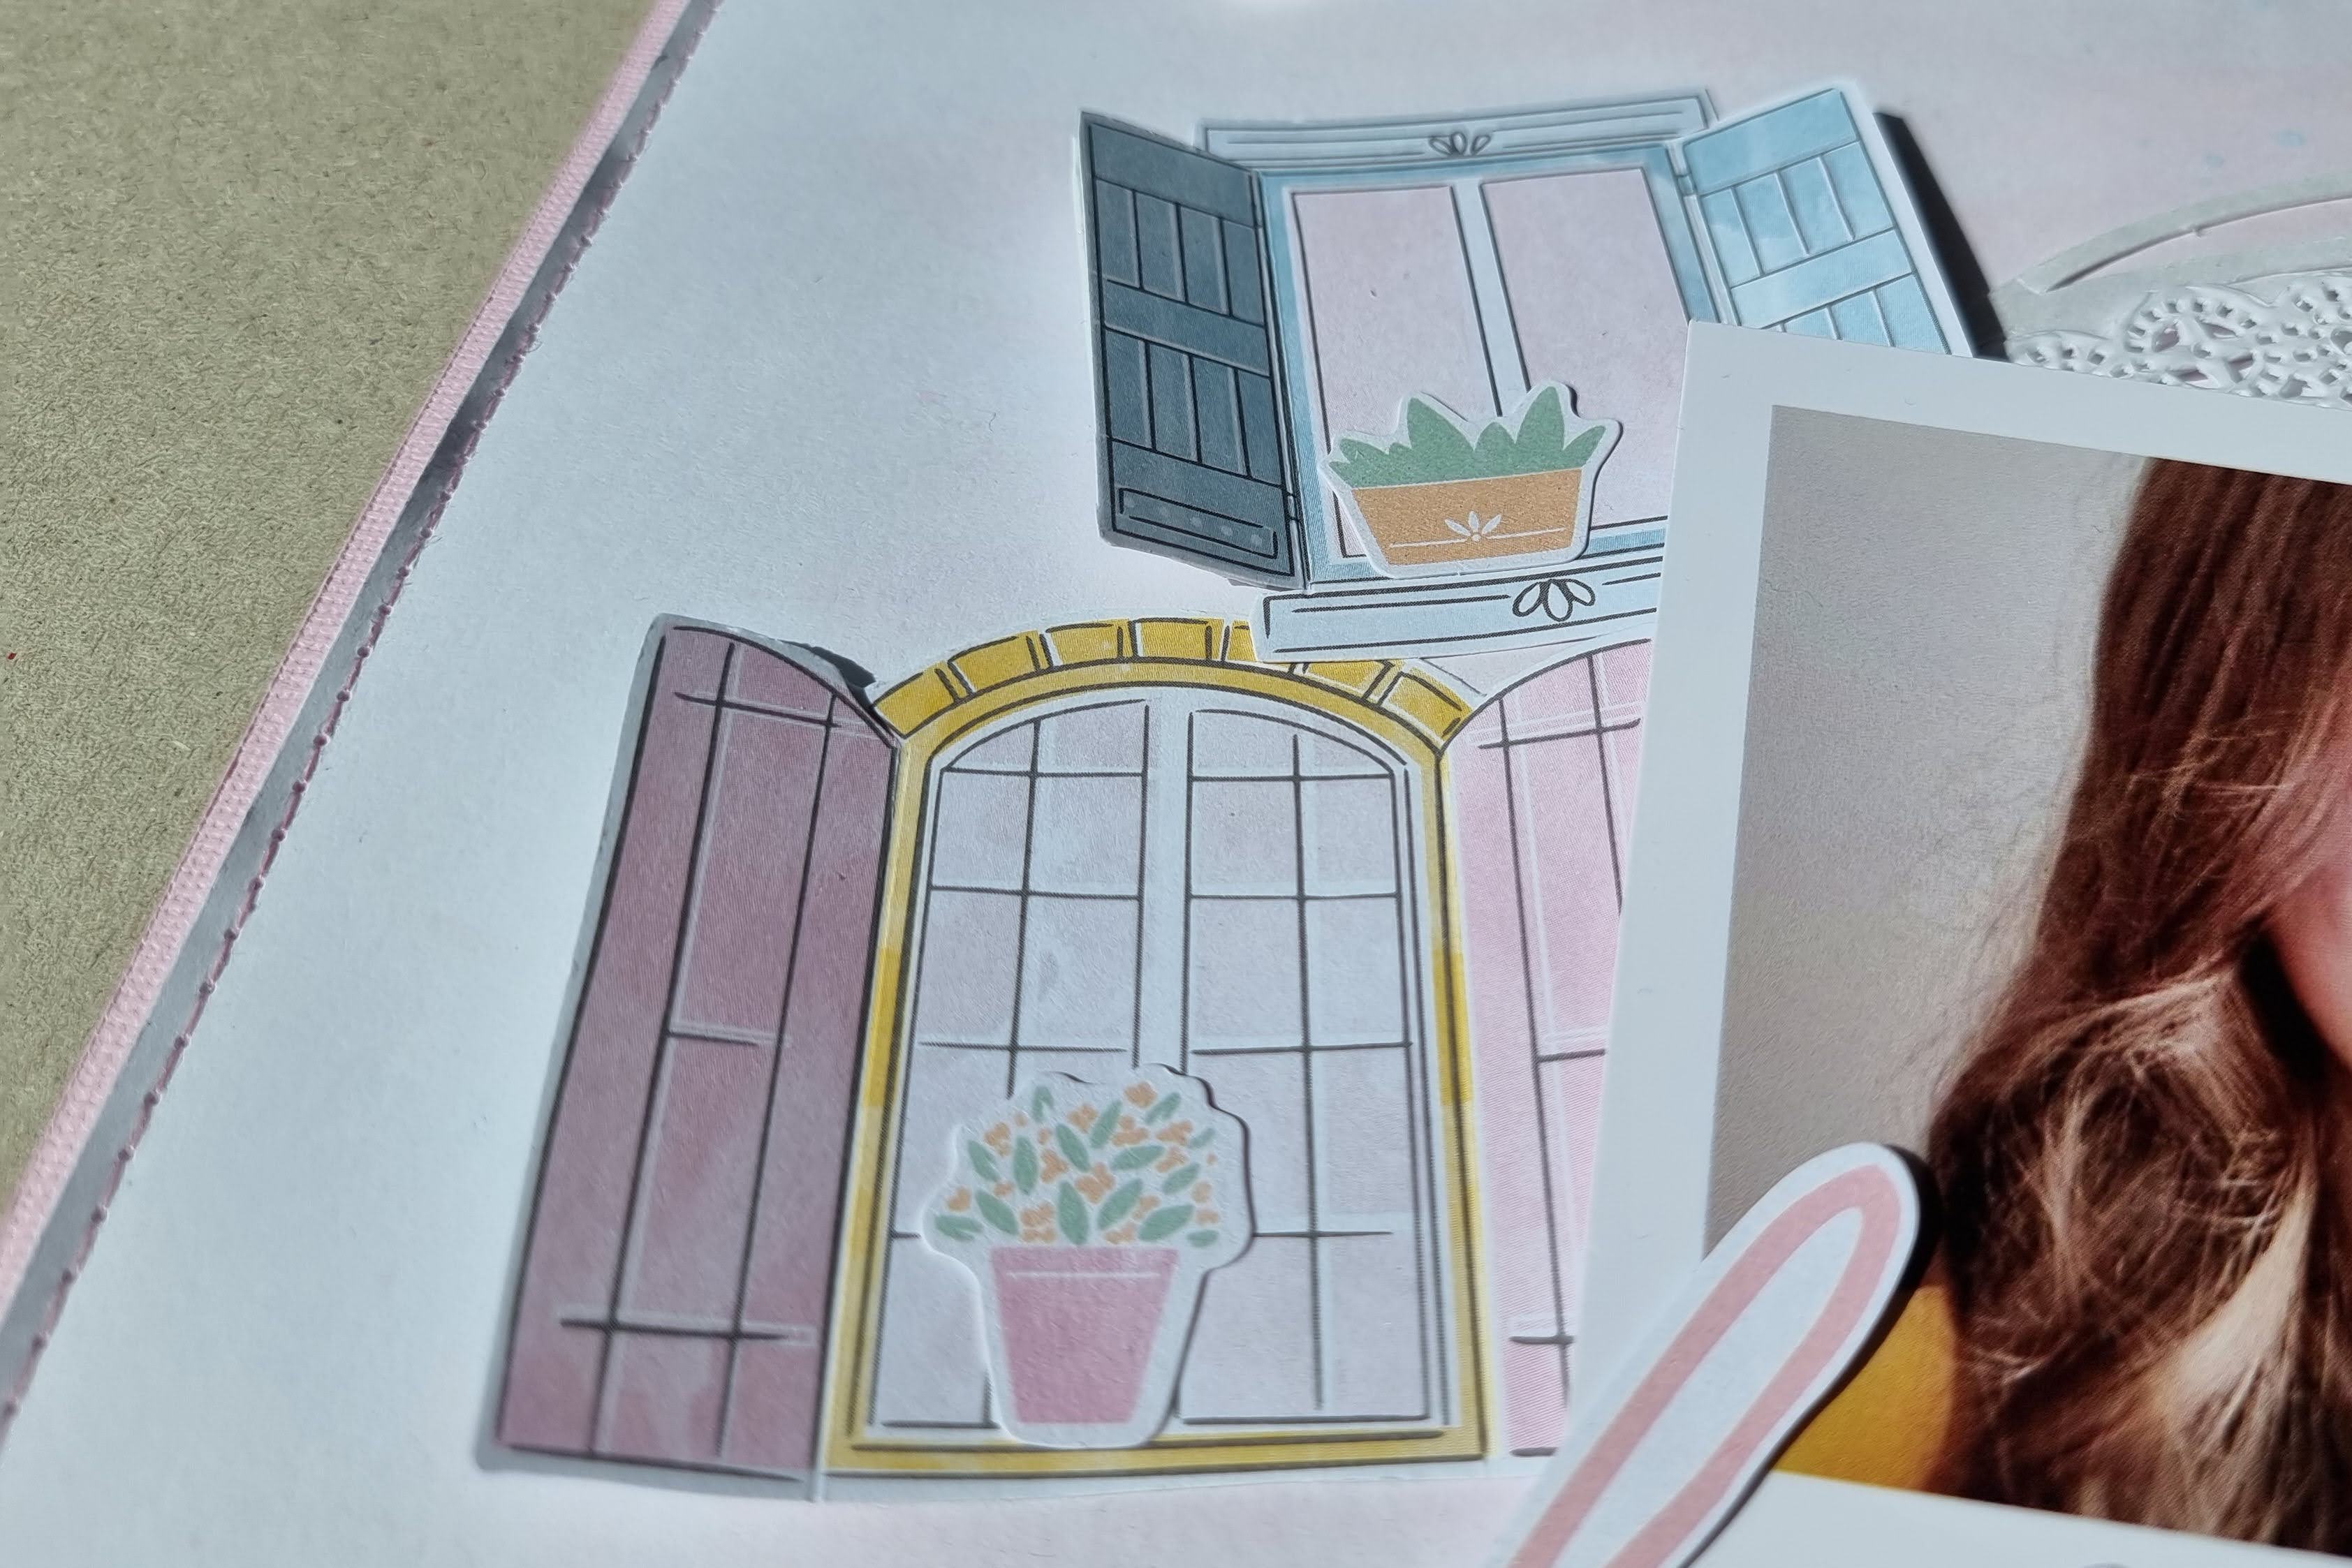
Today I have another scrapbook layout to share using the beautiful Happy Heart collection from Pinkfresh Studio. For this layout, which is inspired a great deal by a layout by Paige Evans, I used just two pieces of paper - Celebrate You (2" Squares)  and Keep Growing (Blue B Side), some words from the Ephemera Titles Pack, a few sequins and lots of hand stitching.

The sheets of 2" squares which a lot of manufacturers have started producing are very versatile and can be used in many way. You can use them in their entirety (like in this layout I created a couple of years ago using Simple Stories), use a few of the squares either whole of fussy cut as embellishments, or as I have with today's layout, use some of the squares in a grid design. You could also cut your own 2" squares from patterned papers if the collection you're using doesn't include a sheet of squares.


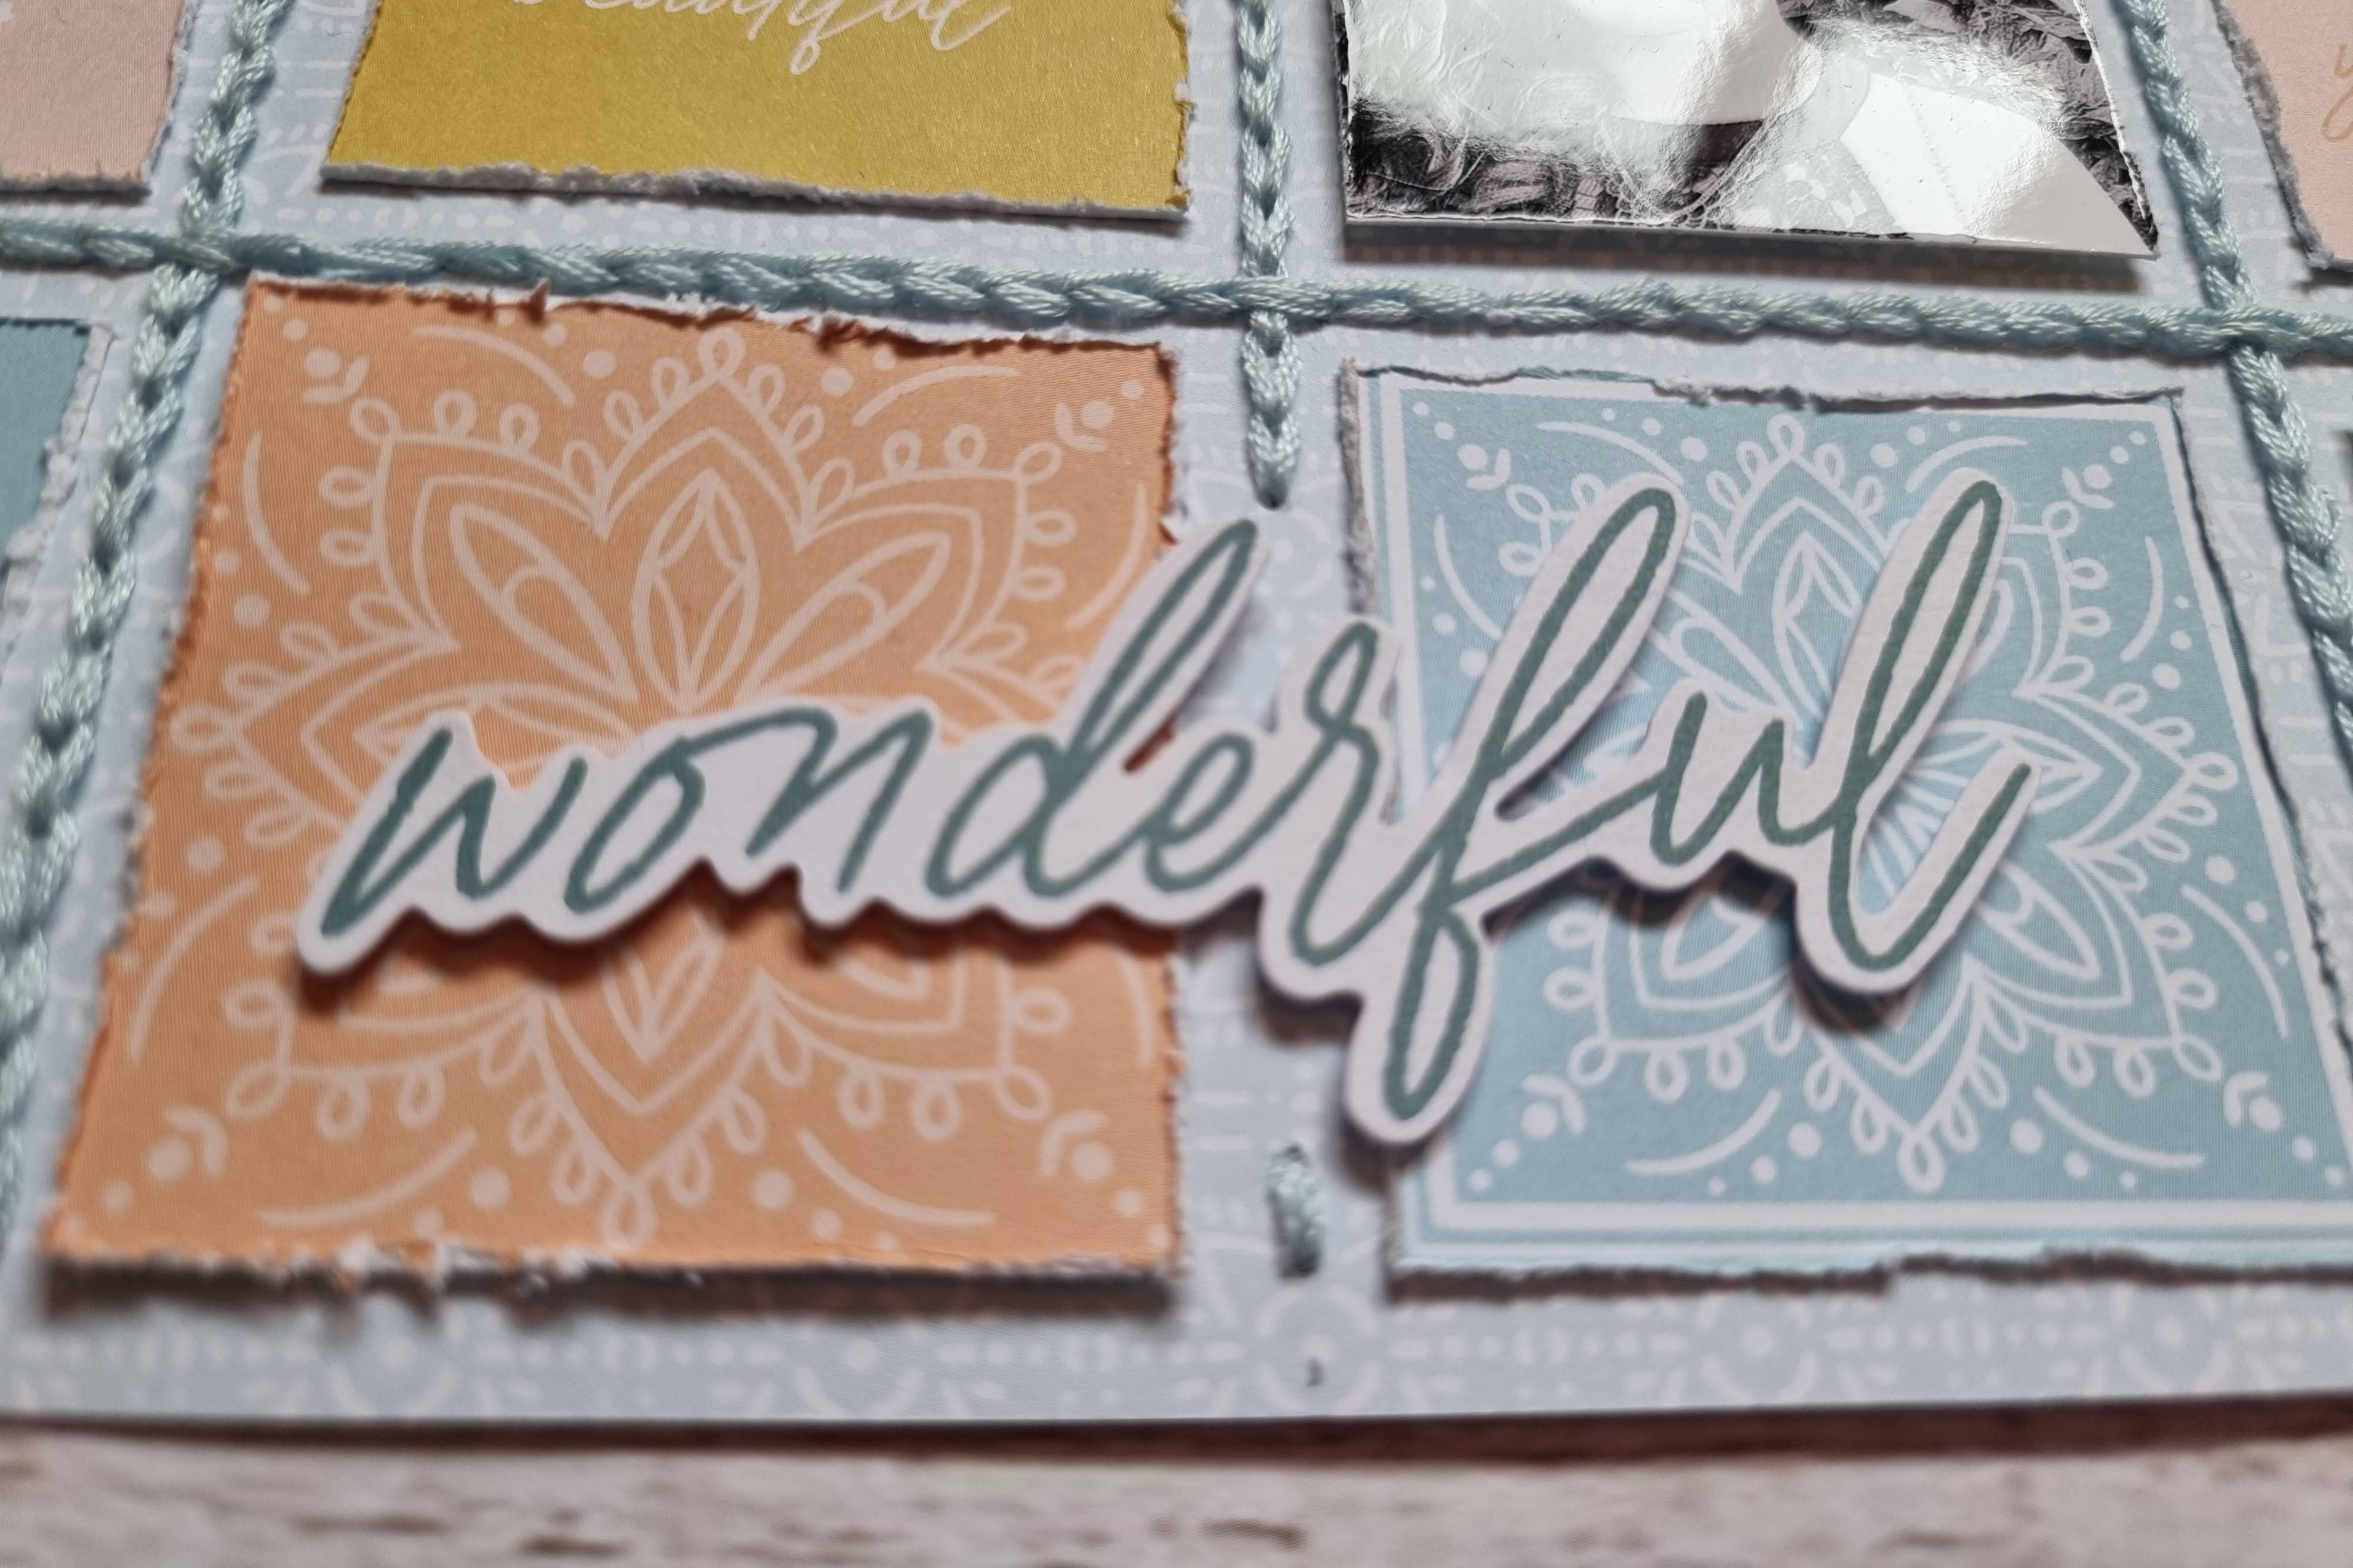
I started with a sheet of the pale blue Keep Growing paper and then chose 19 of the 2" squares from the Celebrate You paper which I arranged in a grid with six 2" square black and white photos. I distressed all the edges of the squares and arranged them so that the colours were evenly distributed throughout the grid. The photos were mounted on 3D foam to raise them up and make them more prominent.


I then took a few words from the Emphemera Titles Pack and with 3D foam underneath I placed these on top of some of the squares.


I almost left the layout at that but decided to do some hand stitching on the layout. Firstly I stitched over some of the designs on the squares.


Then I poked a serious of holes into the layout where I wanted to stitch grid lines and using 6 strands of pale blue embroidery thread I stitched the lines using a chain stitch. This was a real labour of love and took a long time to complete but I really like the finished effect and the added texture it gives the layout. It would have probably been easier to stitch the lines before I glued down the squares, but as the stitching was an afterthought that wasn't an option.


Finally, I added a few sequins to a couple of the squares and called the layout done.


Monday, 2 May 2022

Pinkfresh Studio Happy Heart - Beautiful Spring

Today I'm sharing another scrapbook layout using Pinkfresh Studio's Happy Heart collection and some photos taken last May. The colours in this collection are predominantly pastels and teamed with white cardstock appear very soft but, team the collection with some bright cardstock and the colours come to life.


For this layout I first created a photo collage using five photos from a day out and attached this to a piece of white cardstock onto which I had already typed my journalling and tied a piece of pink bakers twine


The white cardtock, which was a little larger than A4 size, was then stuck to a sheet of the Keep Growing paper.


Next to the journalling I added the title with the word 'Spring' cut from bright Pink Cardstock and the word 'Beautiful' taken from the Ephemera Titles Pack. 


The words 'at Herstmonceux' completed the title using some white Pink Paislee Foam Thickers from my stash.


To pick out the pink in the patterned paper and to add some of the bright pink colour to the top half of the layout I added a punched border above the photo collage using more of the bright pink cardstock. 


The layout was embellished using one of the Ephemera pieces and a fussy cut butterfly from the Beautiful Moments paper.

Wednesday, 13 April 2022

Pinkfresh Studio Happy Heart - Lovely

Today sharing a new scrapbook layout using the Happy Heart collection from Pinkfresh Studio. This collection is one of two new collection from Pinkfresh Studio and it screams 'Spring'. The colours are from a typical Pinkfresh Studio pastel palette and the collection is full of images of flowers and butterflies and phrases with good vibes.


To start, I created a mixed media background on a sheet of smooth white cardstock using a watered down mixture of distress oxide ink in Worn Lipstick and Tattered Rose. Once this was dry, I used some white Cosmic Shimmer Texture Paste and a Moroccan style stencil (similar to this one from Kaisercraft) to create some texture on the layout. Splatters of blue watercolour paint were also added.


Next, I placed a scribbled circle cut file onto the layout next to where my photo would be placed and a short piece of white cotton lace was glued to the bottom edge.


My photo was a Polaroid style photo and was layered on top of the cut file with a white paper doily tucked under one edge.


Then, I fussy cut some windows from the Favorite Place paper. The windows were placed either side of the photo.


To give the layout more dimension I scored along the window shutters and folded these upwards. 3D foam was placed underneath the shutters to keep them raised. In the Ephemera pack I found some tiny plant pots so I added these to the window sills. 

Fussy cut flowers from the Happiness Blooms paper were layered around the scribbled circle.


Many of the papers in the collection are perfect for fussy cutting and I can see me using lots of the butterflies from the Beautiful Moments paper in addition to the three used on this layout. 


One of the titles from the Ephemera Titles Pack was ideal for the layout and nestled perfectly at the bottom of the photo.


Finally I added a few pink enamel dots to the layout before trimming the whole layout down to 11.75" x 11.75" and machine stitching it with white thread onto a sheet of 12x12 pink Romance Bazzill Cardstock.

Wednesday, 20 January 2021

Pinkfresh Studio Oh What Fun - Winter Magic

One final layout today using the Oh What Fun collection from Pinkfresh Studio.

My layout today is a wintery layout using the papers, etc in the collection which are mainly blue in tone.


On a sheet of 12x12 white cardstock I smooshed some blue watercolour paint and when this was dry I splattered some white acrylic paint on top to create a snowy background. Using my sewing machine I then stitched round the outside edge of the layout using gold metalic thread.

I layered pieces of the Merry Everything and  Home for the Holidays papers as well as a piece of the packaging from the pack of chipboard stickers in the centre of the layout and then added my 6x4 photo on top. My photo was double matted with white cardstock and gold glitter card. More machine stitching was added to the papers and the edges were roughed up with my fingernails.


From the Good Tidings cut apart sheet I fussy cut a house and used this as an embelishment. 


I printed my journalling onto a label from the cut apart sheet and added this to the layout. A matching frame from the Merry Everything paper was tucked under the left side of the photo.


Using the word 'magic' from the sheet of Puffy Phrase Stickers and some navy blue Pink Paislee Foam Thickers I created the title below the photo.


A chipboard sticker was added to the top right corner of the photo.


I felt the layout needed an extra pop of gold so I added torn strips of gold glitter card on the edges of the layout and some cut strips to the central cluster.


The layout was completed with the addition of the date using die cut gold glitter numbers and some snowflakes also punched from the glitter card.

Wednesday, 6 January 2021

Pinkfresh Studio Oh What Fun - Wake Me Up When It's All Over

Happy New Year! My layout today uses the Pinkfresh Studio Oh What Fun collection. This is the fourth layout I created with this collection (although I still have to show the third!) and I only had a few bits and pieces left so decided to create a clean, simple, grid layout which can often be created with minimal supplies.

I used a silly Snapchat photo on my layout that was taken on the eve of 2020 and created a reflective layout about the past year. Little did Lara and I know when we took this photo what the coming year would bring.

I started with a 12x12 sheet of black cardstock and into this I matted a slightly smaller sheet of white cardstock. Using my sewing machine I machine stitched using black thread round the edge of the white cardstock.

In the centre of the layout I created a grid with my 6x4 photo, a couple of images from the Good Tiding cut apart sheet and a scrap of the Home for the Holidays paper. Each element was matted on black or red cardstock to make is pop from the background.


On one of the cut apart images I layered a frame from the Merry Everything paper , a black and white stripy tag from my stash, a postage stamp image from the Merriest Wishes paper and added a star punched from black cardstock and a black sequin. Some 3D foam was put underneath some of the embelishments to add some dimension.


My title, which uses lyrics from one of my favourite songs by Avicii, was created using a 'Wake me Up' cut file and some mini puffy alphabet stickers. The title block was embellished with another postage stamp image from the Merriest Wishes paper, a punched star and more black sequins.


The remaining cut apart image was embellished with a chipboard sticker from the collection, a punched star and sequin.


My journalling was printed onto a plain white tag, embellished with a punched star and was then tucked behind my photo.

Friday, 18 December 2020

Pinkfresh Studio Oh What Fun - Christmas Traditions

I have another scrapbook layout using the very festive 'Oh What Fun' collection from Pinkfresh Studio. I'm really enjoying using this collection and scrapbooking memories of Christmas past is really getting me in the Christmas mood. 

I started with a 12 x 12 sheet of red Lava Bazzill Cardstock and on this I layered a sheet of of the Good Tidings patterned paper (B Side) which I had trimmed about ¼" off of each edge and using my sewing machine I stitched round the edges with white thread.

In the centre of the layout I placed my three 4x6 photos which I had double matted as a block with the red cardstock and some gold mirror card. The photos were placed at an angle with foam underneath to add some dimension. 


Using my Silhouette I die cut my title from some more of the gold mirror card and backed this with smooth white cardstock.


I used some images from the Snow Globes patterned paper to back the letters D & O of the title and  glued it to the layout, slightly overlapping the bottom edges of the photos, with foam underneath so it was the same height as the photos.


I made tags from the Good Tidings patterned paper and mirror card, threaded these with bakers twine and tucked these behind the photos. I always add a little wet glue behind the loose ends of the bakers twine to keep them in place.


I embellished with some of the puffy stickers and chipboard stickers from the collection and various wood veneer stars from my stash.


I finished the layout by typing my journalling and date onto white cardstock, outlined the words in black gel pen and added them to the bottom of the layout.

Friday, 4 December 2020

Pinkfresh Studio Oh What Fun - Merry Memories

Today on the Papermaze blog I'm sharing my first layout using the Pinkfresh Studio Oh What Fun collection. This collection is a holiday collection full of bright happy colours perfect for scrapbooking Christmas memories or for making cards and mini books.

For this layout I used a 5x7 photo of Lara taken when she was a lot younger.

I took a sheet of mustard coloured cardstock for my base and onto this I added a piece of the Merriest Wishes paper and a torn piece of the Home for the Holiday paper (B side). Using metallic gold thread I machine stitched round the outside edges of the patterned papers. My photo was double matted onto some of the mustard cardstock and some gold glitter card and was attached to the right side of the layout with 3D foam underneath.


I also machine stitched over the top of the printed 'strings' from which the printed baubles were hanging.  I punched some tiny stars from some gold glitter card and used these to embellish the printed baubles and added 3D foam pads underneath the stars to raise them up.


I made some bunting using images cut from the Merriest Wishes paper and some red Bakers Twine. This was added above my photo and some punched stars were glued to the ends of the twine.


I used some of the Puffy Phrase Stickers from the collection for my title. 


I printed my journalling onto some white cardstock using my computer, outlined it with a black gel pen and added it to the bottom left corner of the layout.

Finally I dotted some tiny clear crystal stickers around the layout to add a bit of sparkle.