Showing posts with label Echo Park Paper Co. Show all posts

Monday, 17 February 2025

Echo Park - Chilling With My Snowmies - Snowflakes are like Kisses

My last layout using the Chilling With My Snowmies collection from Echo Park. I've enjoyed working with this collection and love the colours in it.


I started with a sheet of smooth white cardstock and onto the middle of the page I applied some watered down Distress Oxide Ink in Faded Jeans using the packaging technique. Once the ink had dried I then added some splatters too.


Using some white acrylic paint and the Creative Expressions Mini Snowflakes Stencil I added some snowflakes on top of the blue ink. Once the layout was completed not much of the mixed media shows, but it does give a subtle background to the patterned papers.


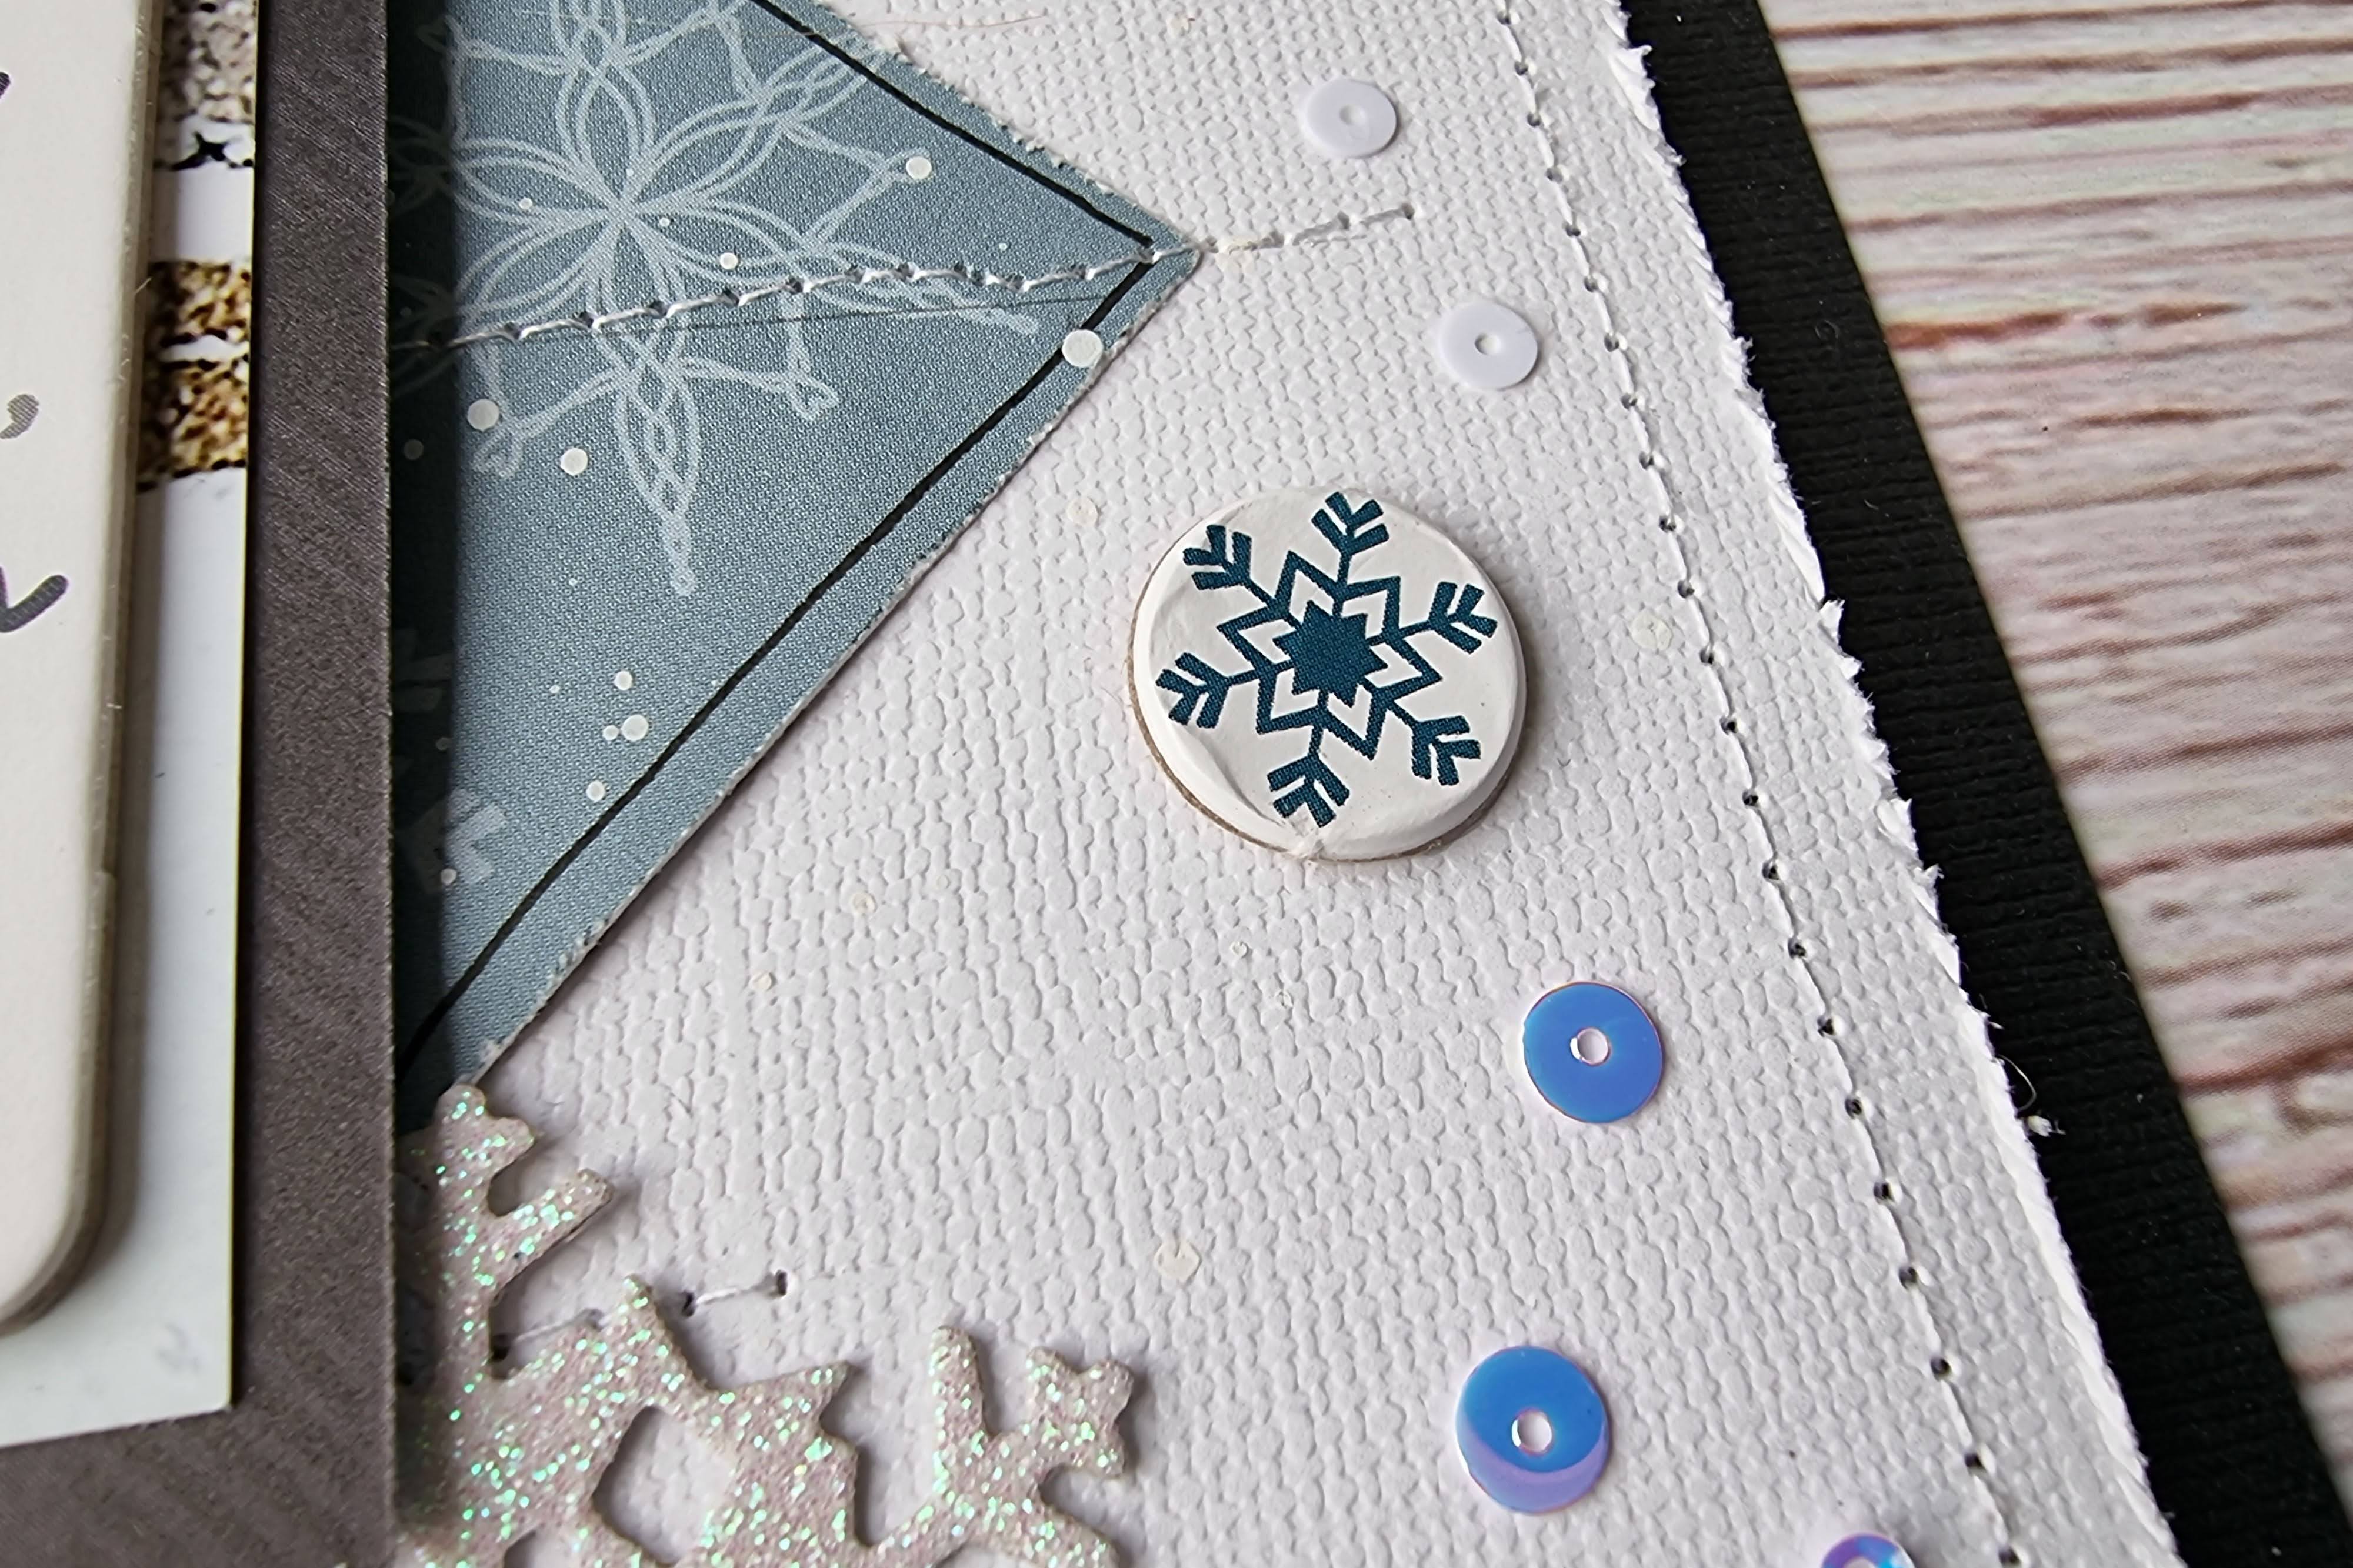
I layered pieces of the Colorful Snowflakes, Feeling Frosty Snowflakes and Penguins & Snowballs patterned papers onto the layout, distressed the edges and machine stitched round the edges with white thread.


My 6x4 photo was matted with the Winter Floral paper and placed on the layout with 3D foam underneath to add some dimension. In my stash I found some white pom-pom trim and glued this to the bottom of the photo.


I threaded one of the tags from the Frames and Tags pack with some blue ribbon and placed this in the bottom right corner of the photo.


Underneath the tag I tucked some flowers which I had fussy cut from the Winter Floral paper.


On the Silhouette I die cut the word 'Snowflakes' from some navy cardstock and together with some tiny blue foam Thickers I created a big title at the side of the layout.


Finally I decided to add a pop of colour to the left edge of the layout with a strip of the Penguins & Snowballs paper and also dotted some clear flat back gems around the layout to add some sparkle.

Friday, 7 February 2025

Echo Park - Chilling With My Snowmies - Let it Snow

This is my second layout using the Chilling with my Snowmies collection from Echo Park. As I write this, snow is forecast where I live in the next few days, so it's probably appropriate that I am scrapbooking photos of a previous snowy day.


I started with a sheet of white cardstock and onto this I placed strips of patterned paper from the collection - Feeling Frosty Snowflakes, Winter Floral (B side), Colorful Snowflakes (B side) and a piece of pale blue cardstock. I cut the papers and card on the diagonal so that they would stretch diagonally across my white cardstock leaving just a narrow gap between each strip and round the edges.


I matted two 4x6 photos and a journaling card (from the sheet of multi journalling cards) onto dark blue cardstock and mounted these in a grid design onto another sheet of white cardstock which measured roughly 10" square. The square of cardstock was then matted with dark blue cardstock and placed in the centre of the layout.


Using the Silhouette Cameo I die cut my title from dark blue card, backed it with pink card and used it to fill the bottom right corner of the grid.


Then I started embellishing the layout using flowers fussy cut from the Winter Floral sheet of patterned paper.


I placed clusters of the flowers in two corners, overlapping them slightly.


In my stash I found some very old white wood veneer snowflakes and added these to the embellishment clusters.


In the bottom right corner of the layout I added the date which I had printed on the computer onto some white cardstock.


Finally, I added a few sequins and enamel dots to the embellishment clusters.

Wednesday, 22 January 2025

Echo Park - Chilling With My Snowmies - It's Snowtime

Today I have a scrapbook layout using the Chilling With My Snowmies collection from Echo Park. This collection is such a bright collection with a predominantly red, white and blue colour scheme, with some pink and green thrown in too. It features cute snowmen and penguins as well as florals, snowflakes and snowglobes. Whether you're scrapbooking winter holidays spent on the ski slopes or the occasional flurry of snow in your back garden, this collection is perfect.


I started my layout by removing (gutting) the centre of a sheet of the Snow Globes paper and on top of the hole I stuck a 10" square piece of white cardstock.


With a black fine liner pen I then doodled a line round the edge of the white cardstock.

Onto the white cardstock I layered rectangular pieces of the Feeling Frosty Snowflakes and the Snow Globes paper and added some horizontal strips of the Colorful Snowflakes, Winter Floral and B side of the Multi Journaling Cards papers. All the papers were lightly inked with black ink to add some definition and to make them stand out a bit against the white background.

My photo was matted on white cardstock and added on top of the paper layers.


In the top left corner of the layout I created a small cluster using more of the patterned papers and a die cut from the Ephemera Frames and Tags pack.


Using some white twine and some triangles cut from some white glitter card, I created a banner to hang underneath my photo.


I dug into my button box and found some buttons which matched the colours in the collection and added some to the ends of the banner and also to the cluster at the top of the page. When I first started scrapbooking, buttons were often used on scrapbook pages but I don't see then on pages very often now. I like the pop of colour a button can add and the texture they add. Bring Back The Button!


Using some mini foam alphabet stickers I placed the title directly onto the photo. By positioning it on top of the huge white snowball my son is holding in the picture, the title is easily seen.


Finally, using a manual die cutter, I die cut some snowflakes from more of the white glitter card and dotted these around the layout.

Monday, 20 February 2023

Echo Park Snowed In - Snow Much Fun

Today I have another layout to share using the Snowed In collection from Echo Park. This collection is perfect for scrapbooking those snowy memories.

For today's layout, I started with a sheet of white 12x12 cardstock and in the centre I painted some Arctic Blue Cosmic Shimmer Mist. 

Once the ink had dried, I trimmed the cardstock down by about 5mm on each edge and machine stitched this to a sheet of the Sweater Weather (B Side) paper leaving a narrow border. Using a blue ink pad I then stamped some snowflakes randomly on the background. The mixed media did make the cardstock warp quite a bit, but I'm hoping that once the layout is in an album it will flatten out.

Using my Silhouette Cameo I cut, from black cardstock, a 'Snow Much Fun' cutfile by CUTtoYOU and backed this with papers from the collection.


The backed cutfile was attached to the background with 3D foam underneath to create some dimension. The added dimension and the black cardstock really makes the cutfile pop against the background.

My 5x3.5 photo was matted with more of the Sweater Weather paper and was tucked underneath the bottom right edge of the cutfile.


Using some of the Chipboard Accents I embelished the cut file. 


I chose chipboard words and images that suited the theme of my photo and strategically placed these so the words beneath could still be read.


I die cut some snowflakes from white glitter cardstock and used these to embelish the layout further.

More Chipboard Accents were added to the centres of the glittery snowflakes.

Finally, I added a scattering of sequins to the layout and the names of the boys were printed onto white cardstock and added to the photo.

Friday, 10 February 2023

Echo Park Snowed In - Snowy Sunday Snapshots

Today I have another layout using the Snowed In collection from Echo Park. This collection was perfect for scrapbooking some photos taken during a crafty weekend getaway when we unexpectedly woke to snow on our last morning.


I started with a sheet of white 12x12 cardstock and onto this I placed some vertical strip of paper from the collection. On the right side I placed a 1 cm strip of Polar Plaid (B Side) and on the left side I placed a 1 cm strip of Frosted Flurries, 2 cm strip of the Multi Journalling Cards (B Side) and a 4 cm strip of Polar Plaid (B Side). The whole page was then trimmed down to 11.75" and matted onto a  sheet of 12x12 black cardstock. With white thread I machine stitched along the edges of the papers to add some texture.


Using more paper I them created three large tags and added hole reinforcers punched from black cardstock.


3"x4" photos were matted onto white cardstock and then stuck onto each tag. 


Each tag was threaded with black bakers twine and the thee tags were attached to the right side of the layout.

Using my Silhouette Cameo I die cut the title words from black cardstock, attached the words to three labels cut from the sheet of multi journalling cards and attached one to each tag.


Journalling was printed onto a strip of white cardstock and after machine stitching round the edges I placed this on the left side of the layout.


Finally, a few sequins from the Picket Fence 'Metropolis' Sequin Mix were scattered around the layout for a bit of sparkle.

Monday, 23 January 2023

Echo Park Snowed In - Let it Snow

This is my first layout for the Scrap, Paper, Scissors blog using the new Snowed In collection from Echo Park. I LOVE the colours in this collection - lots of different shades of blue with a little bit of brown and green mixed in. It includes images of snowflakes, snowmen, sweaters, skis and ski chalets. It is perfect for winter scrapbooking. Where I live we've not had much snow yet this winter to photograph but I have lots of snowy photos from the past and this collection was perfect for scrapbooking those photos.

I started my layout by trimming 1 cm off of each edge of a sheet of white 12x12 cardstock and after distressing the edges I mounted this onto a sheet of black 12x12 cardstock and machine stitched round the edges with white thread.

Using a 2" square paper punch I punched squares from several sheets of paper - Polar Plaid, Blizzarding Blue and Frosted Flurries. I then cut each square in half to form triangles, distressed all the edges and drew a line round the inside edges of each triangle using a black gel pen. The triangles were then arranged in the centre of the layout making sure that the different papers were evenly distributed. Once I was happy with the layout of the triangles I glued them to the layout and then machine stitched horizontal lines across them with white thread. This added some texture and also made sure the triangles didn't move. Finally, before going further with the layout, I splattered some watered down white acrylic paint across the layout to mimic the snow in my photo.

I matted my 5x7 photo with the Blizzarding Blue paper and placed this on top of the triangles with 3D foam underneath to add dimension. One of the Phrases from the Chipboard Accents was attached to the bottom right corner of the photo.


To create a title I used my Silhouette Cameo to cut the word 'Snow' from some black cardstock and also some white cardstock. Layering the black and white word created a shadow and made the word more prominent and the title was finished with some small die cut black letters nestled above the word 'Snow'.

Snowflakes were die cut from some white glitter card and used to embellish the layout.

Snowflake Circles from the Chipboard Accent sheet were dotted around the layout and sequins from the Metropolis Sequin Mix from Picket Fence were sprinkled here and there. The Metropolis Sequin Mix isn't a winter themed mix put the white iridescent sequins int he mix were perfect for this layout.


Finally I added the date using black die cut numbers to the bottom of the layout.

Monday, 4 July 2022

Echo Park Endless Summer - The Year of The Pineapple Cake

This is my final layout using the Endless Summer collection from Echo Park. The layouts I've previously created using this collection were both summer themed but this layout isn't, and hopefully shows that themed collections can easily be used for layouts totally unrelated to the theme of the collection. My layout is about a birthday cake that was made in the winter and the inspiration for the layout was the B side of the sheet of multi journalling cards which features a pineapple design.


Onto the yellow pineapple paper I layered rectangles cut from the Beach Days and Sun Rays papers that I had left over from my previous layouts. I matted the papers with black cardstock before attaching them to the layout as I really wanted the colours to pop. I played around with the positioning of the rectangles for quite a while until I was happy with them.


I also created a tag from more of the Beach Days paper and black cardstock and on the tag I mounted a smaller photo and some journalling. I added a black reinforcing ring to the hole in the tag and tied the tag with black & white bakers twine.


My 5x7 photo was double matted with black and white cardstock and then placed on the layout. I left the right side of the photo unstuck so that I could tuck my tag behind the photo. The photo is hidden but the journalling is visible. White paper doilies were also tucked underneath the photo to soften some of the hard edges. I always think paper doilies are a prefect addition to food themed layouts!


I printed more journalling onto a journalling card from my stash and tucked this underneath the bottom left corner of the photo.


I chose a chipboard word from the sheet of chipboard accents and added this as an embelishment.


Some very old puffy stickers from my stash and some newer foam Thickers from American Crafts were used to create the title which was placed at the bottom of the layout nestled into the paper rectangles.

Finally a scattering of black sequins were added.