Showing posts with label Carta Bella. Show all posts

Monday, 20 October 2025

Carta Bella It's Autumn - Autumn Leaves

Here is one last layout using Carta Bella's It's Autumn collection.


For the base, I chose white cardstock. I cut down the 12x12 white sheet slightly and layered it onto a dark brown sheet, which left a narrow border round the edge.


I used a hexagon die (from my stash) to cut out hexagons from the patterned papers. I then arranged them to cascade across the page, moving from the top right to the bottom left. After mixing the colours up, I stuck them to the layout. Before adding any further embellishments, I splattered some brown acrylic paint over and around the hexagons.


Three photos were matted with some light brown cardstock and arranged horizontally across the layout.


Title words were cut from dark brown cardstock on the Silhouette and added to the layout.


Words stickers from the Elements Sticker Sheet were used to embellish the layout.


I added some journalling, printed on the computer, to the bottom of the layout. I used a Vintage Photo Distress Oxide Ink Pad to distress the edges slightly so that the word strips stand out against the background.


The layout was completed with a scattering of gold and copper sequins.

Friday, 3 October 2025

Carta Bella It's Autumn - #Muglife

Today I have a new scrapbook layout to share, featuring the beautiful It's Autumn collection by Carta Bella. This collection is a must-have for autumn-themed layouts. Since my design uses lots of paper layers, I made sure to "gut" as many of those layers as possible to save paper and be more economical with my supplies.


My layout began with orange cardstock. I first gutted the centre of the Fall Flowers paper (the inner piece was saved to use later). I then trimmed the orange cardstock and mounted it onto the B-side of the remaining Fall Flowers piece, leaving a narrow border around the entire background.

I placed a10" square of the leftover Fall Flowers paper (this too was gutted) in the centre of the layout and then layered a slightly smaller piece of the 3x4 Journaling Card paper (B-side) on top, creating a narrow border between those layers as well.


I layered various patterned papers on the layout, then popped up my two photos with 3D foam for dimension.


Using a paper scrap, I die-cut the letters and added the title just to the left of my photos.


The Element Stickers, Ephemera Icons pack, and some fussy-cut images from the patterned papers gave me tons of embellishing options. I started by fussy cutting sunflowers and placed them on the corners of the photos. I used 3D foam on the back of the flowers so they would sit at the same height as the pictures


Word strip stickers from the sticker sheet were dotted around the layout.


Flags and a coffee cup die-cut (from the Ephemera Icons pack) were added in a 
small layered cluster above the title.


I printed my journaling strips onto white cardstock and used them to fill the space beneath the title.


To complete the page, I scattered a few yellow enamel dots here and there.

Wednesday, 17 September 2025

Carta Bella It's Autumn - Autumn Colours

Whilst visiting the website for Echo Park / Carta Bella recently I stumbled across their free downloadable PDF project instructions. These projects are created by the Echo Park Design Team and each PDF is a complete guide that includes a photo of a finished project, a detailed supply list of the Echo Park/Carta Bella products used, and step-by-step instructions. I decided to put one of these projects to the test, and I can't recommend them enough. 


The project I chose was designed for Carta Bella's "On The Farm" collection, but I decided to adapt it using the beautiful "It's Autumn" collection instead. I made a few small changes to the layout to suit the papers and embellishments I had.

I began by taking a sheet of white cardstock. After trimming it slightly, I adhered it to the B-side of the Multi Journaling Cards paper, creating a narrow border around the outside.


Using white thread, I machine-stitched a straight line around the inside edge of the white cardstock.


Towards the top of the layout I layered pieces of the Pumpkin to Talk About, Color of Fall Leaves and Fall Festivities papers. On top of the layered papers I added 3 photos which had been matted with white cardstock. I added 3D foam under the photos to add some dimension.


Beneath the layers of paper and photos, I added the title. The words were cut using my Silhouette machine with papers from the collection. To make the letters in the word 'Autumn' stand out, I created white mats for each one before sticking them to the page.


Journaling was printed onto white cardstock and after punching the left edge with a notebook border punch, the journaling block was tucked beneath the title.


I embellished the layout with stickers from the Element Stickers sheet and a few enamel dots.

Wednesday, 15 November 2023

Carta Bella Fall Fun - Crisp Leaves and Autumn Memories

Today  I have another Autumnal layout using Fall Fun from Carta Bella. I'm really enjoying using this collection which perfectly matched the colours in some photos I had taken during a woodland walk last year.

This layout started out as a scraplift of this layout which I created for the blog in 2019 and whilst the finished layout bears some similarities, it is also quite different. I find that if I am stuck for inspiration, scraplifting a layout (my own or by another scrapbooker) can get the creative juices flowing.

I started my layout by trimming down a sheet of the Freshly Fallen paper by roughly 5mm on each edge,  layered this onto a sheet of mustard coloured Bazzill cardstock and then machine stitched with white thread around all the edges.

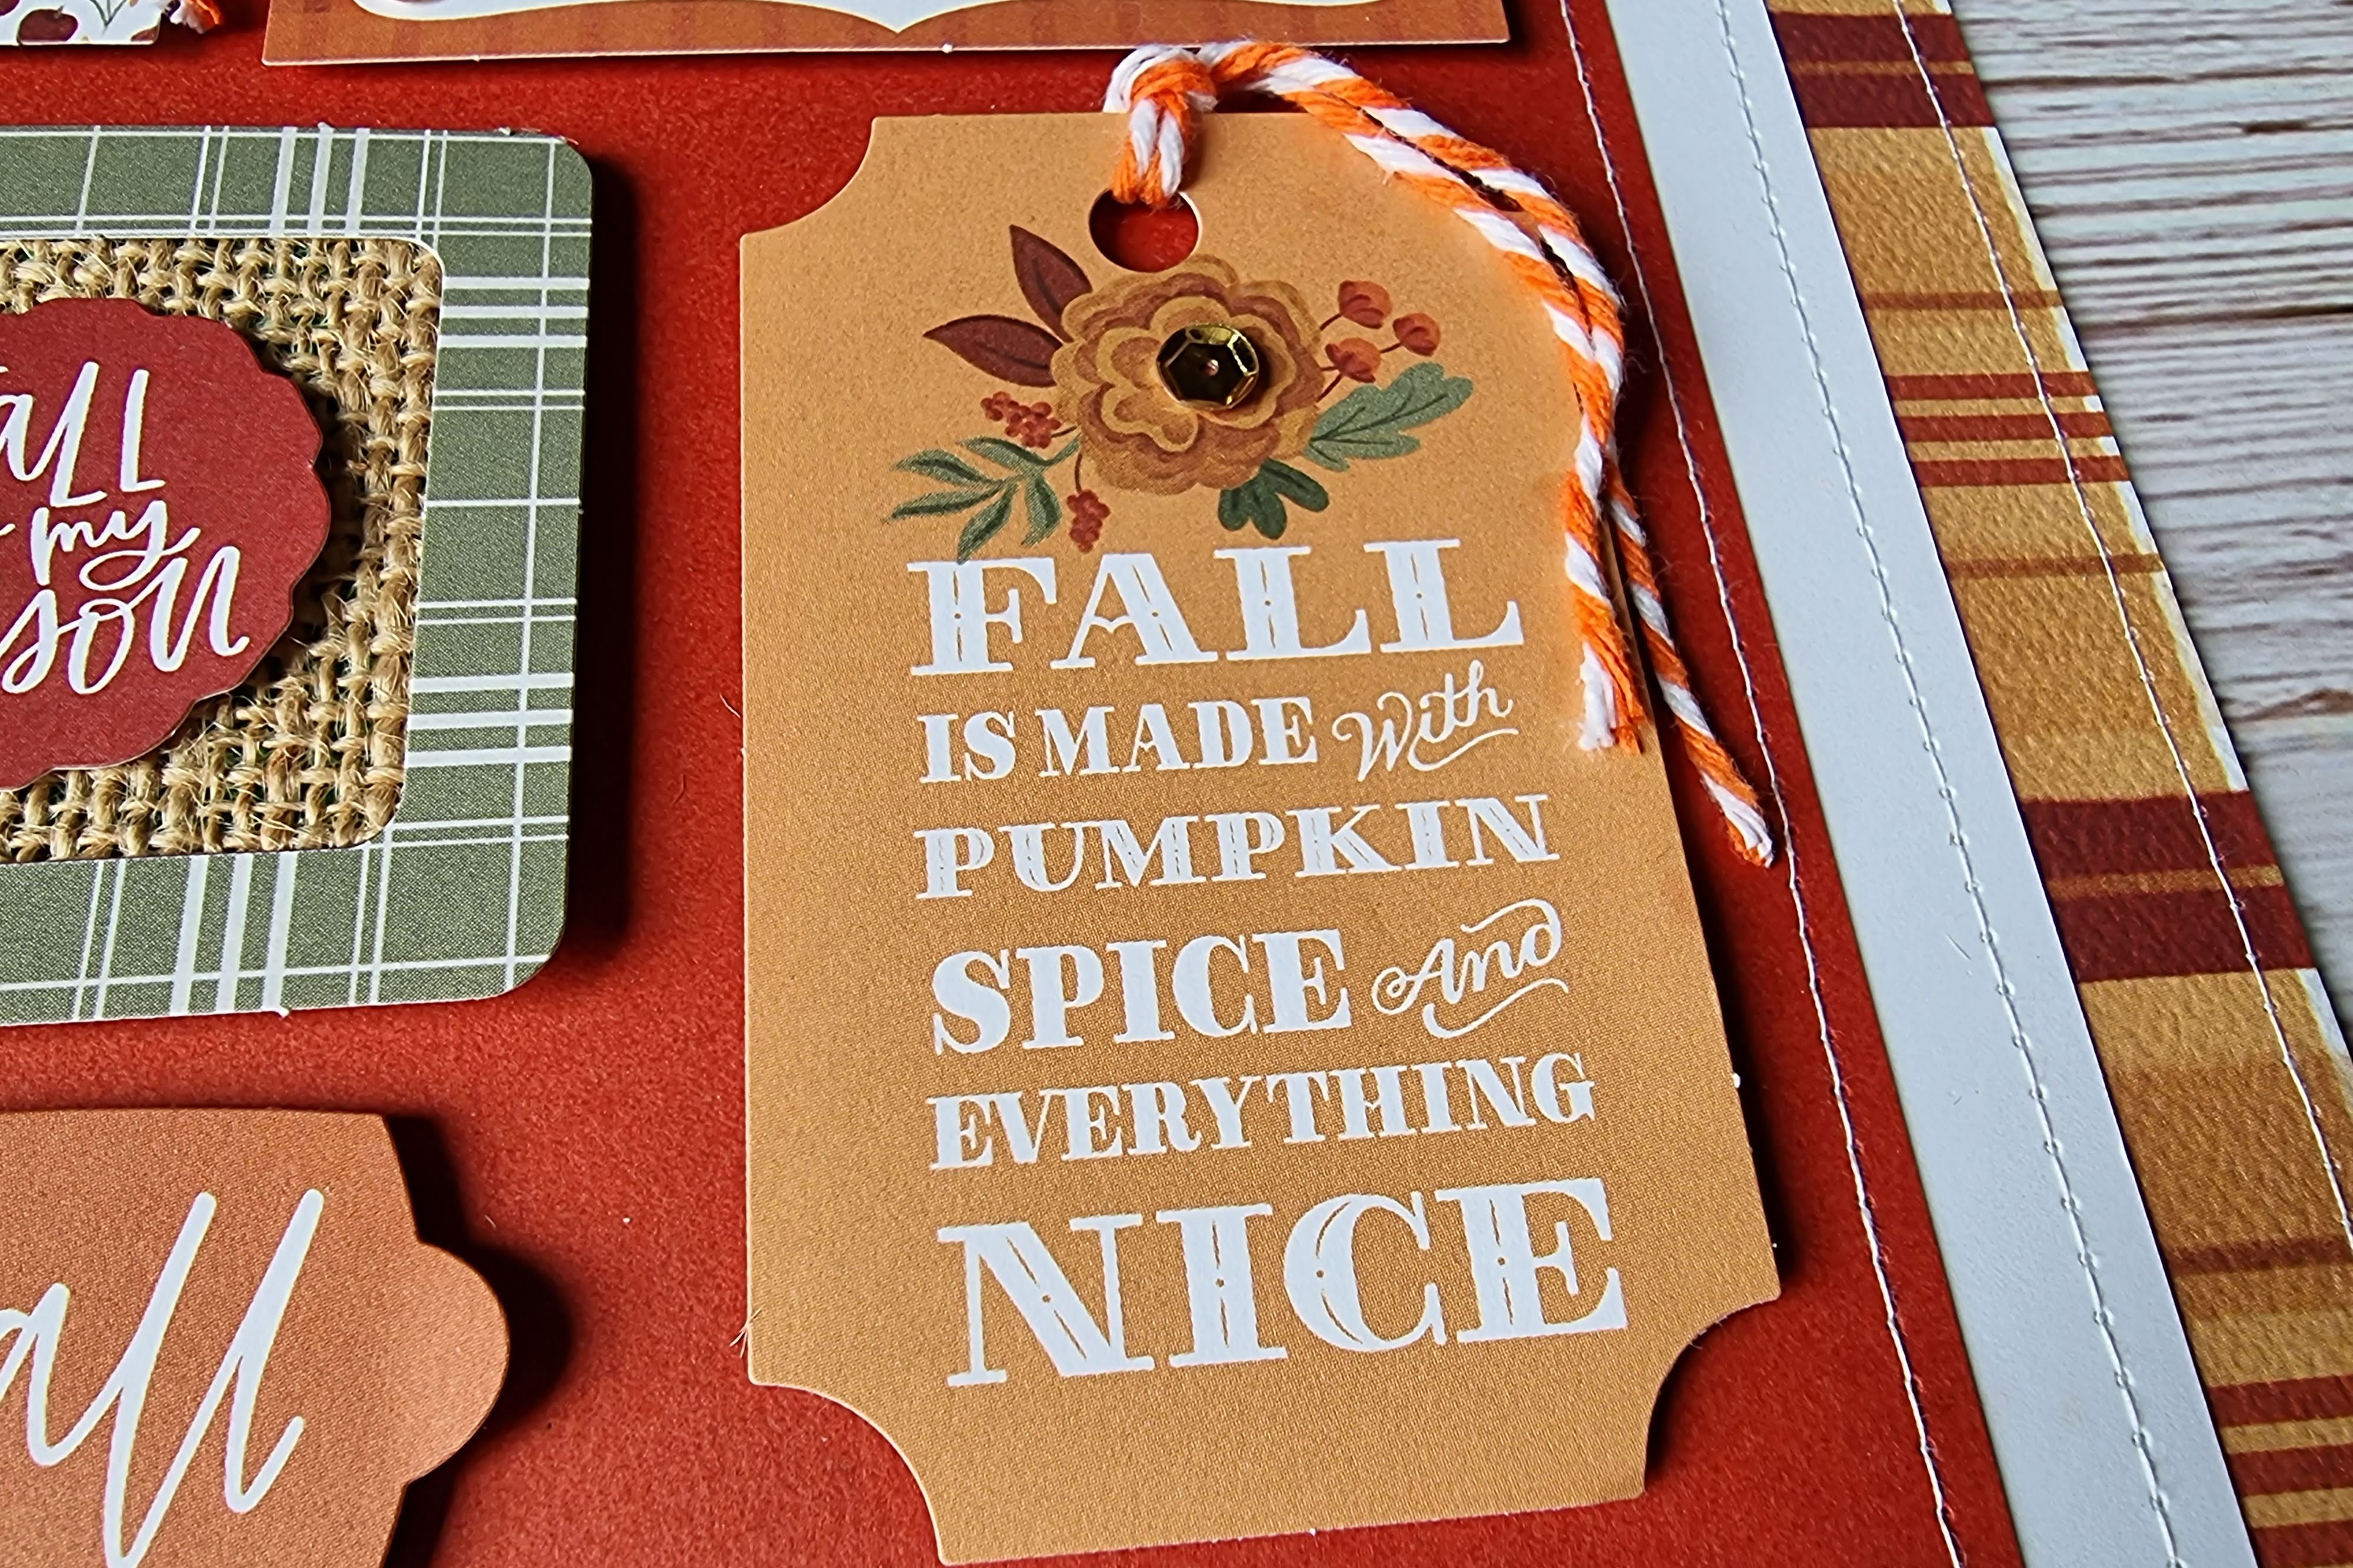
Pieces of the Flannel Warmth and B side of the 3x4 Journalling Cards cut apart sheet were then attached to the layout with one piece made into a pocket so that a journaling tag made from more of the mustard coloured card could be slipped into it.


Two photos, one portrait and one landscape, were printed with white borders and matted with the Freshly Fallen and Autumn Abundance papers and mustard cardstock. The photos were placed on the layout with the main portrait photo mounted on 3D foam to raise it up and make it more prominent.


The words from one of the 6x4 Journaling cards were used as a title placed next to the photos with 3D foam underneath. As the word 'Crisp Leaves' in the title were blue I felt that the layout needed some other blue elements so I threaded the tag with blue bakers twine and also tucked some pieces of the B side of the Pumpkin Spice paper underneath some of the paper layers. I think this made the blue in the title look more intentional.


Using some textured gold card from my stash I die cut several leaves on the Silhouette Cameo. Using a scoring tool I scored some veins into the leaves and bent then in the middle to give them some dimension.


The leaves were scattered across the layout from top left to bottom right to give an impression of falling leaves.


Finally I added a journalling strip printed on the computer underneath one of the photos and dotted a few copper coloured sequins here and there.

Friday, 27 October 2023

Carta Bella Fall Fun - 'tis the Season for Giving Thanks

It is certainly feeling very autumnal here and as I like to scrap with the seasons, I was really pleased when Vanessa at Papermaze sent me some of the new Fall Fun collection from Carta Bella to play with. 


This collection uses a colour palette which fans of Carta Bella will be familiar with and features images of pumpkins, leaves, sunflowers, plaids, wreaths and lots more. As the colour palette is an old favourite for Carta Bella, you can also easily easily mix and match old and new Carta Bella collections. My layout uses a harvest photo taken at a National Trust property.


I started this layout by spraying some Mango Blaze Cosmic Shimmer mist onto a sheet of smooth white cardstock. The mist contains mica so has a lovely shimmer. Once the mist had dried, 5mm was trimmed from each edge of the cardstock and layered onto a gutted sheet of the Flannel Warmth paper leaving a narrow frame around the outside. The mist did warp the cardstock a little but once the layout is in album I don't think it will be noticeable. Using brown thread I machine stitched round the edges of the white cardstock.


In the Silhouette Store I found an autumnal wreath cut file and cut this from some dark brown cardstock. The cut file was then backed with papers from the collection and some scraps of cardstock.

The backed cut file was placed in the centre of the layout and the 5x7 photo which had been matted with dark brown card was added.


On the sheet of Chipboard Phrases I found an appropriate plaque and placed this beneath the photo.


In my stash I found some extremely old paper sunflowers and paper leaves and added these to the cut file.


Finally I added a journalling strip printed on the computer at the bottom of the page and dotted some enamel dots and some sequins from Picket Fence around the layout.

Friday, 4 November 2022

Carta Bella Welcome Fall - Remember, Remember the 5th of November

Today I have another layout to share using the Welcome Fall collection from Carta Bella.

Here in the UK, tomorrow (November 5th) is Guy Fawkes Night also known as Bonfire Night when we celebrate a failed gunpowder plot in the 1600s to blow of Parliament's House of Lords. We mark the occasion with bonfires, fireworks and sparklers. Every year I try unsuccessfully to photograph the fireworks but some years ago I did manage to capture in a rather blurred photo Lara's thrill of the sparklers and that is the photo on today's layout.

Onto a sheet of 12x12 white cardstock I layered several pieces of patterned paper and card - an 11.5" square of the 3x4 Journalling Cards  (B Side), a 10" square of white cardstock and an 8.5" square of Fall Flannel paper which was matted with a thin border of gold mirror card. Before sticking down the journalling card paper I choose a card form the centre of the paper and saved this to use on the layout later. The hole in the paper where the card was removed is thankfully hidden by the other paper layers.

I then used one of my favourite methods of adding texture, by machine stitching along the edges of all the papers with white thread.


Using my Silhouette Cameo I cut a star border cut file by Paige Evans. The border was cut twice - once in white cardstock and once in black cardstock. The two die cuts were then layered slightly offset on top of each other, to create a shadow effect, and when placed on the layout made the cut file stand out more against the multi-coloured background. Some of the stars were backed with gold mirror card and some were left open. The cut file was then place diagonally across the layout and one extra star was also tucked into the left side of the layout.

My 6x4 photo was matted on gold mirror card and placed on the layout with some 3D foam underneath for dimension.


I created a tag from the 3x4 journalling cards which I had saved earlier. I matted the card on gold mirror card and added a hole reinforcer and black and white Bakers Twine. The tag was tucked behind some of the stars on the right side of the layout.


The title was added to the bottom of the layout.


'5th' and 'November' were die cut from black and white cardstock and layered in the same was as the stars to create a shadow effect.


Additional words were created with letters die cut from black fun foam. I like to mix fonts, etc when creating titles to give some extra interest. 


Finally I sprinkled a few gold sequins here and there.

Friday, 21 October 2022

Carta Bella Welcome Fall - Hello Fall - Ephemera Frames & Tags

Today I am on the Scrap, Paper, Scissors blog with another scrapbook layout using Carta Bella's Welcome Fall collection. For this layout I have used a pack of the Ephemera Frames and Tags.


I started with a sheet of the Fall Flannel paper and in the centre of this added an 11" x 11" sheet of white cardstock and a 10" x 10" sheet of California Poppy Bazzill Cardstock. To add some extra interest I then machine stitched round all the edges with white thread.


My 4" x 6" photo was matted on gold mirror card and placed in the top left corner of the red cardstock with some 3D foam underneath to raise it up.

I then selected some of the pieces from the frames and tag pack and arranged them in a grid on the red cardstock beside and below my photo.


I backed some of the frames with some hessian to give some texture to the layout and added extra die cuts to the centres.


One of the die cuts was also matted with hessian. I think the hessian give the layout a bit of a 'country' feel.


Tags were threaded with some orange bakers twine.


A few sequins were glued to some of the tags for a bit of sparkle.


All the die cut pieces were glued to the layout and 3D foam was placed underneath them all for dimension.